Giant Little Debbie Christmas Tree Cake
By Lindsay Moser
Lindsay Moser, also known as The Hunger Diaries, is a viral digital content creator bringing joy to eating and cooking with her delicious, easy-to-follow recipes and enthusiastic appetite. Check out all her recipe videos on TikTok, Instagram, and YouTube, and even more appetizing posts (especially if you love pasta like Lindsay does!) on her website TheHungerDiaries.com
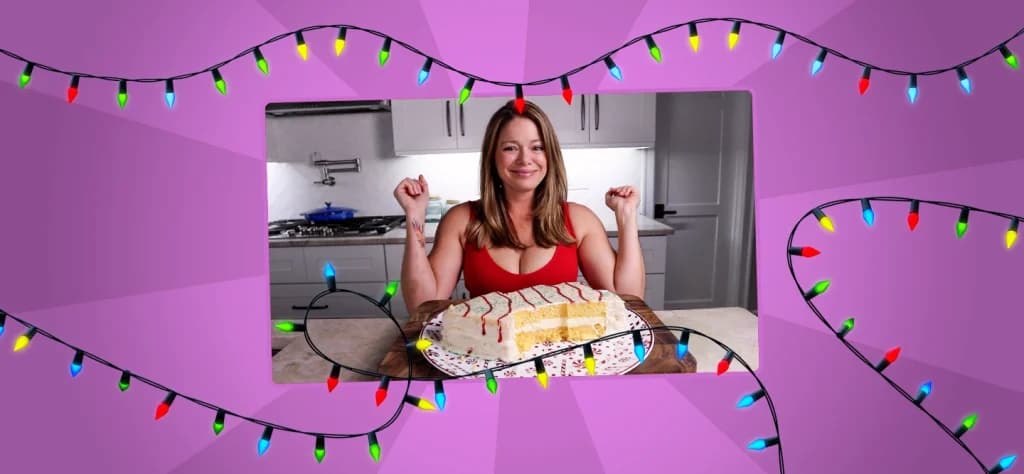
I really did it this time. I made a giant Little Debbie Christmas Tree Cake… like, the size of an entire baking sheet. And honestly? It might be one of my favorite things I’ve ever baked. Not because it’s fancy or complicated, but because it hits that perfect mix of nostalgia, holiday magic, and pure chaotic fun—the kind of thing you make once and immediately think, “Okay, this might have to become a tradition.”
If you grew up eating those little Christmas Tree cakes, you already know the vibe. They’re soft, sweet, a little ridiculous, and somehow they taste exactly like December. My brother absolutely loved them. We’d inevitably find the box conveniently stashed in his room somewhere around this time of year. He passed away a few years ago, and making the food he loved brings me this special kind of joy. It feels like holding up a glass and saying, “Hey, this one’s for you.” There’s something grounding about honoring someone you miss through food, especially around the holidays.
Alright, back to happy stuff. The good news about this cake — it might look intimidating, but the whole thing is totally doable. You don’t need pastry school skills or specialty tools. I used two 9×13 yellow cake layers, made from boxed cake mix — because we’re keeping it humble and realistic. I doctored the mix with Greek yogurt and whole milk to get that soft, almost bouncy, snack-cake texture. If you know, you know. The filling is that marshmallowy, fluffy, cloud-like middle we all remember, but slightly less sweet, so it doesn’t fight the icing. It spreads beautifully once the cake is chilled, and yes, chilling is key here. Cold cake means clean cuts and no heartbreak when you carve that giant tree shape.
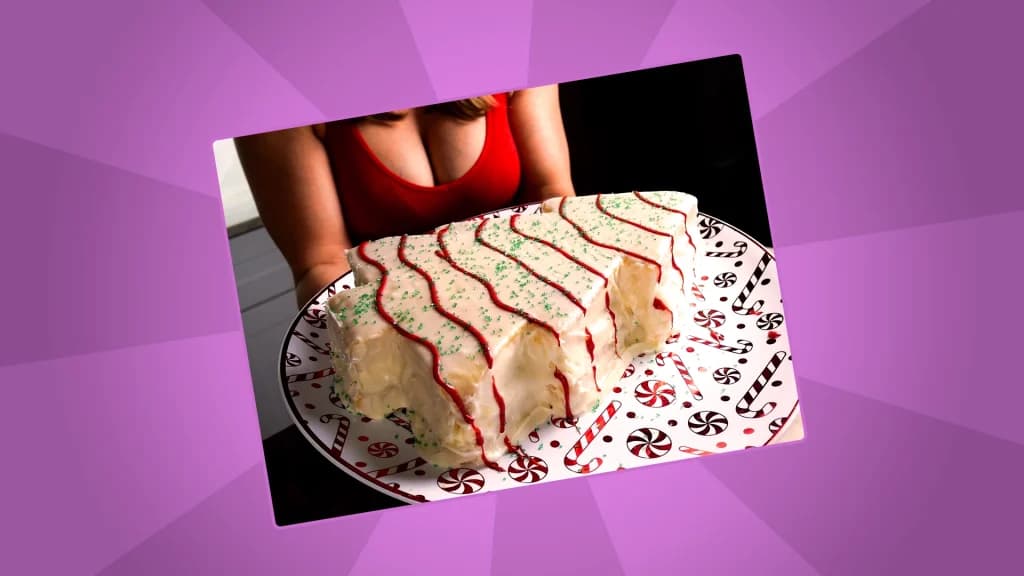
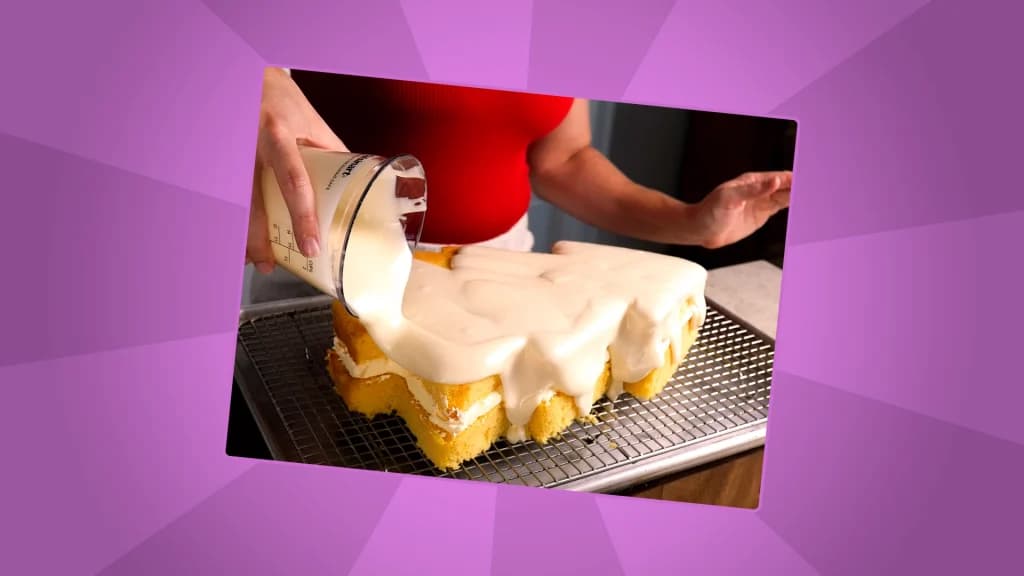
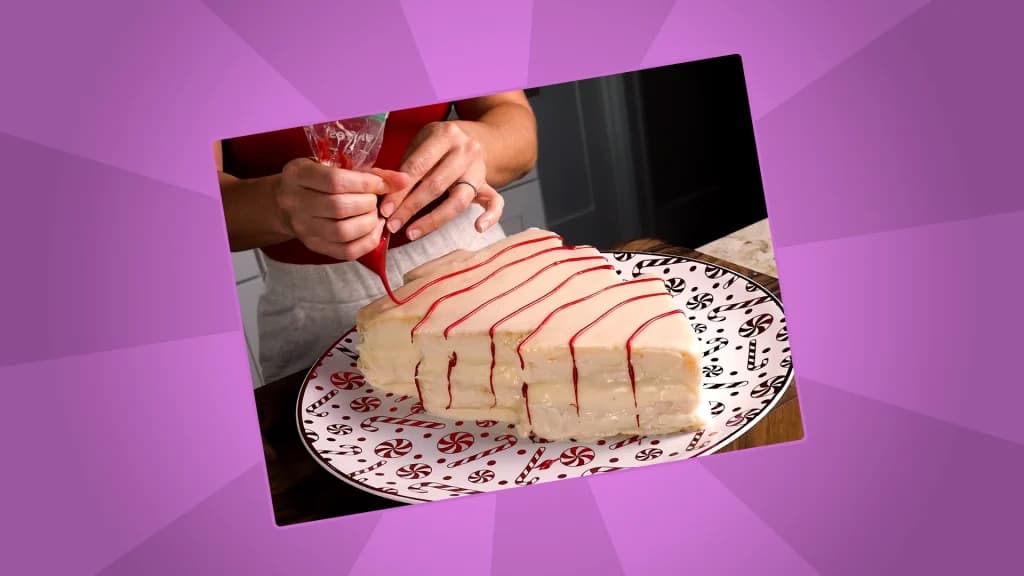
Then there’s the icing—a satisfyingly pourable glaze that sets into that signature glossy shell. It’s simple, it’s smooth, and it makes the entire cake look like it just came off a Little Debbie conveyor belt… if the conveyor belt had a “supersize” button. The final touch is the piped red “garland” (mine is artificial dye-free for some much-needed balance here) and green sprinkles (which I thought were artificial dye-free and weren’t — you win some, you lose some). The moment those go on, the nostalgia just HITS.
This cake was honestly so joyful to make at every stage. When the cake came out of the oven, the whole house smelled amazing — there’s just something about yellow cake. When I stacked them with the marshmallow filling, it was like building the world’s coziest dessert sandwich. When I carved out the tree (which I highly recommend a template for to get it just right — we did ours freehand!), I was a little nervous, but was so excited the entire time. And when I poured the icing over the top and watched it settle into every little slope and corner, it was SO satisfying — like visual ASMR — and oddly emotional—like watching something transform from “cake” into “memory.”
Cutting into it was obviously the best part, though. The slice is thick and soft, with that nostalgic flavor that teleports you back to the lunch table or the grocery store snack aisle the week after Thanksgiving. It tastes like childhood but… grown up, bigger, and somehow even more comforting.
And honestly? If you need a little joy this holiday season—real joy, not the “I bought a new candle and hope it fixes everything” kind—make a giant snack cake. Make something silly. Make something nostalgic. Make something your childhood self would lose their mind over.
It works. It really does.
If you end up making this giant Christmas Tree Cake, too, let your girl know! I want to see your trees, your red squiggly garland, your slightly wonky edges, your proud smiles. Because that’s what this season is about, right? Finding tiny moments of magic wherever we can. And if one of those moments happens to be cutting into a comically oversized snack cake? Even better.
Christmas Tree Cake Recipe
Serves: 24
7g protein, 549 calories per serving
Prep Time: 1 Hour 15 Minutes
Cook Time: 45 Minutes
Cooling Time: 2 Hours – Overnight
Total Time: 4 Hours +
Ingredients
Cake
- 3 15.25oz boxes yellow cake mix (I used Pillsbury Moist Supreme)
- 12 large eggs
- 2 cups whole milk
- 1 cup neutral oil (canola, avocado is fine as well)
- 1 ½ cups Greek yogurt (whole milk)
- 3 tsp vanilla extract
- ½ tsp almond extract
Marshmallow Filling
- 1 cup (2 sticks) butter (room temp)
- 1 cup marshmallow fluff
- 2 cups powdered sugar
- 2 tbsp heavy cream
- 1 tsp vanilla extract
- ¼ tsp fine sea salt
Icing
- 4 oz white chocolate
- ½ cup heavy cream
- 4 cups powdered sugar (sifted)
- 3 tbsp light corn syrup
- 3 tbsp neutral oil
- 1 tsp clear vanilla
- ⅛ tsp fine sea salt
The Rest
- Red food coloring*
- Green sprinkles*
Instructions
- Preheat the oven to 325°F and arrange racks in the upper and lower thirds of the oven.
- Prep your pans. Spray two 9”x13” baking pans lightly with oil, then line with parchment. Spray the parchment lightly with oil as well.*
- Make your cake batter. In a large bowl, add your eggs, milk, oil, Greek yogurt, and extracts and whisk until smooth. Add your boxed cake mixes and whisk just until smooth and no lumps remain. Don’t overmix!
- Pour and bake. Divide the batter evenly between the two pans and spread so the batter is level and goes all the way into the corners and edges. Bang the pans on the counter a few times to release any air bubbles, then pop in the oven, with one pan in the upper third rack and the other on the lower third. Halfway through baking, swap the pans and rotate them. Bake for 35-45 minutes, or until a toothpick comes out mostly clean in the center. You’re looking for a few moist crumbs and maybe a smudge, not wet batter or completely dry. Remove from the oven and cool in the pans, on the countertop for 20 minutes before transferring onto a cutting board or platter and cooling to room temperature.*
- Make the filling. Add all the ingredients under “marshmallow filling” to a bowl and whisk until smooth. Add your filling to a piping bag or large plastic bag with sharp (not pleated) corners.*
- Cut and fill your cake. Use a sharp, serrated knife to cut each (completely cooled) cake, one at a time, into a Christmas tree shape. We drew a template first so we could just trace the outline with a knife – this way both cakes will be the same.* Twist your makeshift piping bag just above where the filling comes up to, and cut about ½” off the tip of one of the piping bag corners. Pipe the filling just inside the outside edges of one of your cakes, then fill the middle. Use an offset spatula (or standard spatula or knife) to spread the filling evenly over the cake, then top with your other cooled cake, pressing down slightly to make sure the filling lines up with the edge of the cakes (don’t press too hard, you don’t want the filling to squeeze out). Transfer the cake to a wire rack over a sheet pan and set aside.
- Make the ganache. Add your white chocolate chips to a bowl. Heat the heavy cream in a small pot on the stovetop until steamy (you can also do this in a small bowl in the microwave), then pour the heated cream over your white chocolate and let sit for a few minutes to gently melt. Whisk until completely smooth. Let cool till slightly warm, but still pourable.
- Finish the icing. To a large bowl, sift in the powdered sugar, add the salt and whisk. Add the corn syrup and neutral oil, the slightly warm chocolate ganache and vanilla and whisk until completely smooth and glossy.*
- Ice the cake. Reserve 2-3 tbsp of the icing (for the garland), then pour the remaining icing over the cake, starting in the center and working towards the edges. Go slowly so you can cover as much as possible. You can always use the icing that’s dripped down to patch any areas that don’t get covered.*
- Decorate and serve. Add red food coloring to the 2-3 tbsp of icing you put aside and whisk to combine. Make another (smaller) makeshift piping bag with a smaller plastic bag and snip just the tip off one corner. Pipe the red icing onto the cake to make your garland, then top with green sprinkles and enjoy!
Notes
- If you don’t have two 9”x13” pans, that’s ok! Mix each cake separately (just divide the ingredients in half under “cake” for each) and bake separately, allowing for the appropriate cooling time with each. What you don’t want to do is mix all the batter at once and leave half the batter sitting around for a long time. This could result in less rise, an uneven bake, or even make the cake gummy.
- If you want to make the cake a day in advance, just wrap the completely cooled cakes in plastic wrap and then in tin foil and refrigerate until the next day.
- Make sure your Christmas tree template is about as tall and wide as your cake pans. You can use the extra cake for cake pops or as a snack on their own!
- When filling your plastic bag with the marshmallow filling, it makes it easier if you first put one of the corners of the bag all the way down into a large cup, then fold any part of the bag that sticks up past the top of the cup around the outside edges of the cup. This adds stability and concentrates all the filling into one corner, which is what you want when piping!
- I try to avoid artificial dyes when I can, but sometimes it really helps to have a time-saving hack like boxed cake mix. There are other boxed cake mixes that don’t have artificial dyes, but they’re not as readily available, and the ones I found weighed differently than standard boxed cake mix, so I chose to play it safe for my sanity. I used red food coloring that had no artificial dyes, and THOUGHT I bought an artificial dye-free green sprinkle, but turns out I didn’t. Stress is a silent killer, friends. Lol, just do your best within your limits, whatever they are.
- You want the icing to be thick like honey – pourable, but not runny. If it’s too thick, you can add ½ tsp or so of warm water or milk, and if it’s too thin, you can add 2-4 tbsp of powdered sugar.
- If you want the sides of your icing to be a bit thicker and give some more coverage, pour the icing only over the center of the cake, then add a bit of softened butter to the remaining icing and whip until smooth. Spread the now-thicker icing onto the sides of the cake. You can also reserve the icing that’s dripped down from the sides and add a bit of butter to that.
Wrap up your baking adventure with a touch of holiday fun at Cafe Casino. Seasonal games like Gifts from Santa or Winter Wonders will keep the cheerful spirit going long after the oven cools.